Node JS is getting the boom in the market. What is Node.js and why it increasingly gaining popularity in the market?
Node JS is a Server Side JavaScript Framework which changes the total concept of a server. It mainly helps the developers to build the highly scalable application and handle the thousands of simultaneous connections easily.Node JS is the fastest JavaScript Engine.
Node JS can build using MEAN stack(MongoDB, Express, Angular, Node JS) and as we have covered about Angular JS and MongoDB before so Today we will focus on the Node JS, Express, and little bit MongoDB.
What is Node JS?
Node JS was invented in 2009 and developed by Ryan Dahl at Joyent. Joyent is one of the big software and services company which has a big market in the application virtualization and cloud computing.
Definition of Node JS in a very layman language, Node JS is JavaScript runtime built on chrome’s v8 JavaScript Engine. The chrome browser engine is the v8 engine and node.js is built on the v8 engine. As Google provide engine as open source, Ryan Dahl chooses that for developing Node JS.
Node JS is a JavaScript framework invented to execute the code by interacting with the input and output.
One of the main advantages of Node JS is, Node JS support the Nonblocking I/O. Also, Node JS is an event driven Programming language so it makes an event oriented call and that’s why it is faster.
Why Node JS?
Here, I am going to show why node js is useful for you.
1. Free from deadlocking Process – All language bound to the process and if any code needs more processes to execute code, your server will take the time to respond. In this case, a node is free from that blocking.
2. Event Driven Programming – The task is performed based on the events performed is called Event Driven programming and Node JS is using the same concept.
3. Nonblocking I/O – Node JS is not blocking any of input or output so after you pass input, server will not block resources until getting the output. After making the request, you can move further to handle another request. Node Js handles 10x I/O than the other servers.
4. Easy to build the scalable application – Nowadays scalability is the core part of development so an application can be scale anytime.
5. Same language(JS) for both backend and frontend – This is a very interesting thing as if you know Node JS, you can use it for backend and frontend development.
6. Large open source package System(NPM) – Node JS package system is very large so you get more of developed code ready on the spot. Just you have to learn how the package works and integrate it. That’s it.
Hosting – Now many hosting providers support Node JS Hosting so you can deploy Node JS app with one click only so you don’t need to work more.
7. A big corporate is taking care of project(Joyent) – As Joyent is big corporate, Node JS provide stability of framework.
8. Easy to build real-time application – You can real-time broadcasting, push notification with Node JS very easily.So, These are the benefits of Node JS and are the reasons of the Node JS popularity.
NOTE: Three objects window,document and location is not for backend because backend don’t need these objects.
Installing Node JS
Node JS installation is very easy. Node JS installation can be done in four ways. First of all, Go to the Node JS website which is https://nodejs.org/en/download.
1. Precompiled Binary – if you are in Linux, you will get precompiled binary file and you need to follow the given steps only.
2. Installer – If you are in Windows/ Mac, you just need to use the installer. In that Run and press Next. That’s it.
3. Source Code – Node Js is open source so it provides complete source code. You can use source code also but that requires huge knowledge of Node JS and it is the lengthy part.
4. NVM (Node Version Manager) – Node JS has many versions and some application working in specific versions so for that NVM is the open source project which manages multiple active versions so you can easily manage node.js versions.
Let’s see the NodeJS Installation command using the NVM:
NVM install
This command will check the stable version based on the version number and install the stable version.
To check the version of install NodeJS
node -v
To change the NodeJS version
NVM use
This command will switch the Node JS to passed version number.So, This is all about the Installation. Let’s move to the next section.
Understanding NPM:
NPM is a package manager for Node JS.NPM is the pre-build libraries for Node JS. It was created in 2009 and it was introduced for Node JS in 2011. It is a public collection of packages of open source code for Node JS. NPM is command line client. Whenever you install Node JS, npm will automatically install in your system.
NPM.inc is the company that host and maintains it.It is available at https://npmjs.com.
To get the npm version, following command is used:
npm - v
npmjs is an also provide private repositories to create own packages in that so your package will at one place and have more than 2 lac packages available. You will hardly get this much packages in another language.
Things to know before diving deep into Node Programming:
Some Developers don’t deep dive into the fundamentals of the Node JS. if you know the basic and fundamentals, you can easily develop your own package, can debug code easily.
1. Bootstrapping Application
2. Modules
3. Event Loop
Bootstrapping Application:
In Node JS, Everything works in JSON.Here I will show you how you can start to setup the node js application:
There is one main file which gives information about the application is package.json.
1. npm init
2. package.json
Now, Let’s see how you can bootstrap application in NodeJS.First of all, create the folder for project using the command:
mkdir sample_nodejs_app
In Node JS, each application work like library/package so anyone can install and start working on it.Next, go to the folder sample_nodejs_app and execute the following command:
npm init
After you enter the above command,it will ask few questions as listed below:
1. name : (sample_nodejs_app) – It will take default name which is bracket if not entered.
2. version :(version number) – It will take default version if not entered. Better add version as it play vital role when you get bug.
3. description – Enter the description
entry point : (index.js) – This is the default entry file which is called default. you can override with any file.
4. test command – Whenever you type “npm test”, what all set of command should be fire to test application.
5. git repository – if you are using Git Repository, you can enter here. So, you can easily deploy or update code on server.
6. keywords – You can add keywords matched with package.
7. author – Enter the name of author.
8. license :(ISC) – If you creating public package,what kind of licence applicable, you can enter here.
This will generate the JSON snippet and write it in the package.json file. It will ask for the confirmation.After that package.json file will be created in your application folder which contains following JSON information.
package.json
{
 "name": "sample_nodejs_app",
 "version": "1.0",
 "description": "This is the description of Sample Node JS Application",
 "main": "index.js",
 "author": "Bhumi SHAH",
 "license": "GPL",
}
Now, Your application is Ready!!.
Let’s create the simple demo of Node Js. Open the editor and create one file say index.js and write some code in that:
console.log('Hello World');
Save the file and execute using node command:
Run:
node index.js
The terminal will output the “Hello World”.
Understanding and Creating Modules
The module is a small self-contained piece of code. You can Include module using the “require” statement.
There are two types of modules:
1. User defined
2. System Default
You can use file and folder both as the module. You can load the module from the “node_modules” folder.
Let’s quickly move on to the practical scenario of module by example:
Example:
index.js
var module1 = require('./module1.js');
module1();
Here, I have created a module which is module1.js. You can also use require(‘./module1’), means no need to write an extension, it will check first for module1.js file and if not found, will check for folder and if not found will generate the error.
module1.js
'use Strict';
module.exports = function(){
    console.log('Hello World!!');
}
There are a keyword call exports in that you can include anything you want to perform using the module. Always use the relation path when you are creating the own module.
Run:
You can run the module using the following command in terminal
node index.js
After you execute this module, you will get the login console which displays Hello World.This is very small vanilla module, next let’s see the module with the parameter.
Another Module with Parameter:
This is the another example module which takes parameter. In this example, we will also see how scope works in Node JS. You might get issue in JavaScript if variable scope is not managed properly, you get error.
var salutation = 'Mr';
module.exports = function(name){
    console.log('Hello ${salutation} ${name}');
}

var module2 = require('./module2.js');
salutation = 'Dear';
module2('CreativeDev');
This module is also using export keyword but with the parameter. I have taken parameter name. Here just displaying the Hello salutation and name in the console log. Also, in the example used dollar and brackets for expression declaration which is the new style of ECMAScript 6 which is known as String Interpolation for intuitive expression interpolation.
What will do it here? Here It will display output:
Hello Dear CreativeDev
Here the output is Hello Dear CreativeDev, a module has owned variable which value is Mr. because of scope declaration. When you don’t use datatype like var when you use variable, and you use the variable it will take from global scope. So, First it will check from a global variable name and if exists, it will use the global one.
So, It is better to use var when to declare variable like
var salutation = 'Dear';
So, It is good practice to define a variable with a type. Otherwise, JavaScript will not generate the error and you will not understand error easily.
Let’s see the next module. In this module, We will export the JSON object.
Another module to export
module3.js
'use strict';
function multiply(a,b){
   console.log(`${a} * ${b} = ${a*b}`);
}
function divide(a,b){
   console.log(`${a} / ${b} = ${a/b}`);
}

module.exports={
 multiply:multiply,
 divide:divide
};
index.js
var module3=require('./module3.js');
module3.multiply(12,10);
module3.divide(12,10);
Here in this function, I have created two function to perform the operations and call those functions from the module.exports as the JSON objects.
Next module is about to perform the same operation, just changed the path in requiring function to the folder.so, it will call the default file in this folder.
index.js
var module4=require('./module4');
module4.multiply(12,10);
module4.divide(12,10);
module4/index.js
'use strict';
function multiply(a,b){
   console.log(`${a} * ${b} = ${a*b}`);
}
function divide(a,b){
   console.log(`${a} / ${b} = ${a/b}`);
}

module.exports={
   multiply:multiply,
   divide:divide
};
This is how you can use the folder as the module.
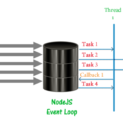
What is Event Loop?
Event Loop makes a node handle high throughput scenarios. Event loop makes Node JS as Event driven programming capable. The Event Loop is technically not available inside Node JS.Node JS is a single threaded process but you can use the concurrent process with events and callbacks which improve the performance.
EventEmitter API is entirely synchronous.Node JS can handle the multiple events through the event module, also, you can bind and listen the event by instantiating EventEmitter class.
Event Emitters:
Event Emitter is the class which handles the event looping.
Here is the basic syntax for Event Emitter:
// Imports events module
var events = require ('events');
// EventEmitter object
var eventEmitter = new events.EventEmitter ();
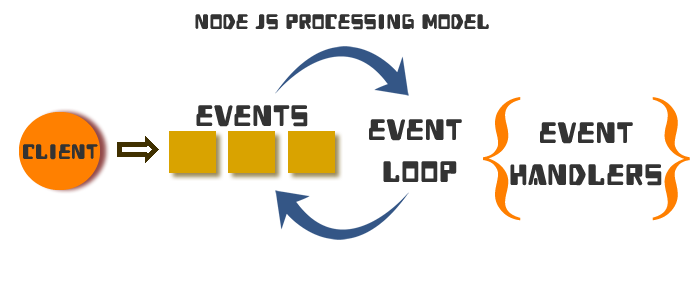
There is one thread that started in the background and it will be passed in the queue as the events. It will add the events inside the queue. The thread will check the handler and execute it. This increase the capacity of Node JS as once event come, it goes to queue and execute it.This is the heart of Node JS to scale it to 10x performance than the other server.
What is Express FrameWork?
Now the main part begins. Express is the web framework for Node JS. Express handles the HTTP requests and give the easy access. This is the most used framework for the Node JS applications. Express FrameWork help a developer to quickly build web sites with a lower the learning curve.
To install express, use following command:
npm install express
This command will create folder node_modules and install the latest stable express module over there. if you want to specify the version you can pass @versionnumnber.
There are four main object of Express:
1. Application (app)
2 .Request (req)
3 .Response (res)
4 .Router ( express.Router)
Routing in Express:
Every language have different routing mechanism. Same way you need to define route in Node JS too.
Routing refers to determining how an application responds to a client request to a particular endpoint, which is a URI (or path) and a specific HTTP request method (GET, POST, and so on).
SYNTAX:
app.METHOD(PATH,HANDLER);
Here in the syntax, Basically four Methods are used for routing are the GET/POST/PUT/DELETE for REST API call. Next is the path for the defining the URL and handler is to handle the request.
Middleware in Express:
Middleware functions are the functions that have access to the request object(req), response object(res) and next middleware function in the application. MiddleWare performs the process before sending the request to the router. For Example, Authenticate before executing admin panel pages.
You can transfer the control to the Next MiddleWare using the next() function.MiddleWare process an HTTP request using the three parameters, req,res and next.
Types of MiddleWare:
1. Application level MiddleWare
2. Router level Middleware
3. Error handling Middleware
4. Built In MiddleWare
5. Third Party MiddleWare
After the version 4 of Express, all above MiddleWare moved from internal to the separate module as Third Party. Now there is only one Middleware which is static MiddleWare because all MiddleWare are not required in all application. Static MiddleWare is used to render the static files. If you want to render some static files like CSS, js from the certain folder, you can use the static MiddleWare.
Application Level MiddleWare: You can have multiple application level MiddleWare.
Application level middleware is refers app on MiddleWare. Express framework provides app.METHOD. Here is the list of Methods:
1. app.get
2. app.post
3. app.put
Here is the example to learn the application MiddleWare.
'use strict';
var express = require('express');
var app = express();
app.use(express.static('./'));

app.get('first', function(req,res,next){
    res.send('This is first request');
    next();
});

var server = app.listen(3000,function(err){
    console.log(err);
});
app.use(function(err,req,res,next){
    console.log(req.method, req.url);
});

app.post('/', function (req, res) {
    res.send('This is a POST request');
});

app.delete('/', function (req, res) {
   res.send('This is a DELETErequest');
});
Here in the example, when first MiddleWare will be called, it will execute the next MiddleWare because next() function is used in that. whereas post-MiddleWare called directly and after it finished, it will not call next MiddleWare.
Router Level MiddleWare:
The Route MiddleWare is work as a separate component in Express4. Here in Route MiddleWare, express binds instance of express.router object. This MiddleWare is mainly used for configuring better routing.
Example:
var express = require( 'express' );
var router = express.Router ();
router.use( function(req, res, next){
    console.log( 'This is test routing');
    next();
});

router.get( '/', function( req, res ){
    res.send( 'This is GET Route' );
});
module . exports = router ;
This example have different routes. You can write as many routes you want with the different path.
Built In MiddleWare
app.use(express.static('./');
It will display the matched file content when you execute it.
Third Party MiddleWare:
Here is the list of Third Party MiddleWare. We will see first two MiddleWare in this article.
1. Express-session : MiddleWare is used to parse the request and change the object. It will create one more object
2. request.Object: This Middleware is for the HTTP(https) request object.
3. Body-parser: body-parser is a middleware that reads input and stores it as a javascript object
4. connect-timeout: Connection timeout is used to set the timeout
Session and Database Handling in Node JS
If you are developing a dynamic website and you want to save data in the database. You can use the MongoDB with Node JS. MongoDB is a document oriented database. You can learn more about MongoDB on this article.
Here, I will take the MongoDB database for managing data.
Connecting to MongoDB using mongoose
Now I am going to show you the connection to the MongoDB with Mongoose.
var mongoose = require('mongoose');
mongoose.connect('mongodb://localhost/blogs');
Here is the MongoDB model definition for a collection(Table):
var crud =mongoose.model('crudapp',{
 FirstName:'String',
 LastName:'String',
 UserName:'String'
});
Using express-session for sessions.
Sample Example:
Now, I will show you the sample demo of CRUD application using the Node JS and MongoDB using the mongoose. Here, I am creating the Insert, Update, Delete application.
crudapp-server.js
'use strict';
var app = require('./crudapp');
var server = app.listen(3000, function(error) {
    if (error) {
        console.log('error starting Crudapp server');
        console.log(error);
    } else {
        console.log(`Crudapp Server running on port ${server.address().port}`);
    }
});
This is the entry point of the application. Here create the module named crud app. This module return the app instance. app.listen is used for listing the port.
app.js
var express = require('express');
var app = express();
var mongoose = require('mongoose');
var bodyParser = require('body-parser');
var session = require('express-session');
var MongoStore = require('connect-mongo')(session);

//Mongoose connection
mongoose.connect('mongodb://localhost/crud');
var crud = mongoose.model('crudapp', {
    FirstName: 'String',
    LastName: 'String',
    UserName: 'String'
});
global.crud = crud;

//Now Adding Body parser
app.use(bodyParser.json({
    type: 'application/json'
}));
app.use(session({
    secret: '',
    resave: true,
    saveUninitialized: true,
    store: new MongoStore({
        mongooseConnection: mongoose.connection
    })
}));

var crudController = require('./crud');
app.use('/crudapp', crudController);

module.exports = app;
First of all, I have included the express js and then created the object or instance of the class. Then we connect to the database MongoDB based on the protocol. For that, I have used a well-known library which is the mongoose.Body Parser is the plugin you must require parsing the encoded data. Express session is used to handle the session inside the express application.
For connecting the application with the MongoDB database, mongoose.connect function is used and this function has to pass your connection string is used. You can also pass username and password for MongoDB connection as other parameters in mongoose.connect function. However, By Default MongoDB is not require username and password for the connection. Next, define the model for the collection. Database Table is known as a collection in MongoDB. It is in the common file but you can make it separate file too. In this mongoose.A model function, the first parameter is the name of the collection and second is the json object to represent the schema. JSON object schema has only three parameters: FirstName, LastName, and UserName with datatype String. However, you can take as many you want String, Int, Mix etc.
Next, is the MiddleWare BodyParser which is used to specify the content type and necessary when you are developing REST API. Then, I have defined the MiddleWare that handles the session. the secret is the key type uses to encode your data. This act as a private key. Resave parameter is used to save immediately when any change inside code.saveUninitialized is used for getting value without initialization.
Now, Create the module named as crud.
crud.js
'use strict';
var express = requestuire('express');
var router = express.Router();

router.get('/', function(request, response) {
    crud.find({}, function(error, cruds) {
        if (error) {
            response.status(500);
            response.send('');
        } else {
            response.status(200);
            response.send(cruds);
        }
    });
});
//Save data
router.post('/', function(request, response) {
    var crud = new crud();
    crud.FirstName = request.body.FirstName;
    crud.LastName = request.body.LastName;
    crud.UserName = request.body.UserName;

    crud.save(function(error, crud) {
        if (error) {
            response.status(500);
            response.send('');
        } else {
            response.status(201);
            response.send(crud);
        }
    })
});
//GET data by id
router.get('/:crudId', function(request, response) {
    crud.findOne({_id: request.params.crudId
    }, function(error, crud) {
        if (error) {
            response.status(404);
            response.send('');
        } else {
            response.status(200);
            response.send(crud);
        }
    });
});
//Put
router.put('/:crudId', function(request, response) {
    crud.findOne({_id: request.params.crudId
    }, function(error, crud) {
        if (error) {
            response.status(404);
            response.send('');
        } else {
            crud.FirstName = request.body.FirstName;
            crud.LastName = request.body.LastName;
            crud.UserName = request.body.UserName;

            crud.save(function(error) {
                if (error) {
                    response.status(500);
                    response.send('');
                } else {
                    response.status(204);
                    response.send('');
                }
            })
        }
    });
});
//Delete
router.delete('/:crudId', function(request, response) {
    crud.findOne({_id: request.params.crudId
    }, function(error, crud) {
        if (error) {
            response.status(404);
            response.send('');
        } else {
            crud.remove(function(error) {
                if (error) {
                    response.status(500);
                    response.send('');
                } else {
                    response.status(204);
                    response.send('');
                }
            });
        }
    });
});

module.exports = router;
In this, Initialized the express object. You will get the router object here.
Conclusion
Node.js is a platform for building fast, scalable and large applications and also can improve the development process.Express is a great framework that is well suited to start creating your web applications. And, as you can see, the result will depend on how you build it, and that will be used to create.
Express simplifies routine tasks, it gives excellent middleware and, at the same time, leaving the implementation of critical parts of the code developer.


Comments (3)