Today I am going to cover small tutorial about CodeIgniter.CodeIgniter is a PHP framework for web application.Basically, CodeIgniter follows the most well-known Model, view and controllers (MVC) architecture. With CodeIgniter, you can write your code from the scratch and maintain some code design pattern which can reduce your development time and increase performance.
CodeIgniter is a simple, lightweight and robust framework which provide helpers, libraries and hook concepts.
Installations
Let’s Start from Installations:
Step 1:
First of all download latest version of CodeIgniter.After that extract zip folder and add that folder into the root directory.That’s it. your CodeIgniter set up is done.
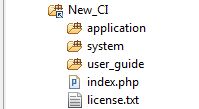
Now let’s take a quick view of CodeIgniter folder structure.

Root directory of CodeIgniter mainly contains System, Application folder. System folder contains core code of code-igniter. We never work on system folders and its only for core files.
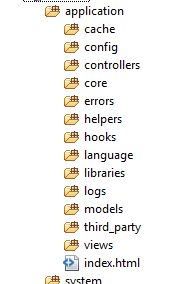
The main folder for us is Application in which we write code and its contain config, controllers, Models, views, helpers, hooks and libraries.see in below screen.

Now, we will dive in four directories which are mainly useful for basic coding in Codeigniter.
- Config: Config contains configuration settings and include some core libraries in which we need to change database configuration as per application.
- Controllers: Directory contains controllers.Its a intermediator between Models and Views.
- Models: Its contain all models of our application which can have a database information.Model class includes insert,update and retrieve queries.
- Views: Its for user view.Its contain template files of web page. Mainly view is for storing your html code and displaying it to the user
Step 2:
Next we will configure database details in database.php file which in application/config folder.
You need to change below code.
1 2 3 4 5 6 7 | $db['default']['username'] = ''; // Replace with desired database username $db['default']['password'] = ''; // Replace with desired database password $db['default']['database'] = ''; // Replace with desired database username |
Step 3:
After configuring the database, run your application with URL http://localhost/ci/ and if you get below the screen, your application installed successfully.
Now it’s time to create simple Application with CodeIgniter.
A Simple Demo Application
We will create simple demo application which display category from the database table.
Step 1:
Let’s Create Category table and insert some categories over there.
1 2 3 4 5 6 7 | CREATE TABLE category ( id int(11) NOT NULL auto_increment, cat_name varchar(255) NOT NULL, PRIMARY KEY (id) ) |
Step 2:
After that create one new file “demo.php” in controllers folder and write below code inside demo.php
1 2 3 4 5 6 7 8 9 10 11 12 13 14 15 16 17 18 19 20 21 22 23 24 25 | class Demo extends CI_Controller { { } { $data['username'] = 'Bhumi'; // To Display Basic Info without Database $data['company'] = 'CreativeDev'; // To Display Basic Info without Database $this->load->view('v_demo', $data); // To load view file. $this->load->model('m_demo'); // To load model file. $result = $this->m_demo->getRows($page); // To get resultset of query echo "<table border=1><tr><td><b>CATEGORY</b></td></tr>"; foreach($result as $item) { echo "<tr><td>" . $item['cat_name'] . '</td></tr>'; } echo "</table>"; } } |
First we create class Demo which is controller class and extends core controller CI_Controller.Inside controller class, we have called __construct and default function index.
Step 3:
Create files m_demo.php in models and add below code over there
1 2 3 4 5 6 7 8 9 10 11 | class M_demo extends CI_Model { function getRows($page) { $this->load->database(); $query = $this->db->query("select * from category"); return $query->result_array(); } } |
Step 4:
Create files v_demo.php in views and add below code overthere
1 2 3 | echo 'Welcome '.$username.' from '.$company; |
Now type in the controller name in the web browser’s address bar as follows:
Say if we are running it in the local PC under localhost:
1 2 3 | http://localhost/ci/index.php/demo |
And Your code will give below OUTPUT
OUTPUT:
1 2 3 4 5 6 7 | CATEGORY Music Dance Welcome Bhumi from CreativeDev |
Also Read:
Image Upload in CodeIgniter
Codeigniter _remap function
Prepping Functions in CodeIgniter
That’s it.Hopefully, this post will helpful to get the basic idea about CodeIgniter. If you have any problem configuring CodeIgniter, Let me know via comments. Don’t forget to share this tutorial with others on Facebook & Google Plus.


Comments (5)