
Nowadays, Most used version control software is Git, right? If you still use SVN or CVS, try out Git and you will never go back to SVN or CVS!. Github is a web site that uses Git to host code or we can say GitHub is the interface of Git for users. There are two ways to host the code in GitHub, one is public, anyone can download and upload code and the other is private. Private is paid version where only the creator of the code can see, download or upload code.
Git init command
Git init command is used when we want to convert a simple project to Git compatible project. If you already have a Git project then you don’t need this command for the project. You can just clone the project from the GitHub URL.
To see how to clone a git project you can visit the section “Create GitHub project using Git software” of my previous article here.
Now getting back to this article, we will learn in deep about init command. We will also see the difference and use of “Git init –bare” command as well.
Creating a Simple Git project
There is two ways of creating Git project. The first way is to create the GitHub project and clone it in Local Git Repository. The second way is to use Git init command to initialize Git project in local Desktop/Laptop. Set the remote origin Git URL of the project. Yes, but you always have to create the GitHub account in both cases.
Creating a Central Git project
The central or main Git project refers to the project which is on a central server or main server. Every developer pulls(Latest update) and pushes(Check-In) code on this central Git project. There is a different way to create such central project in Git. You need the “git init –bare” command to create the central Git project. Maybe it is confusing but below image will help you to get a clear idea.
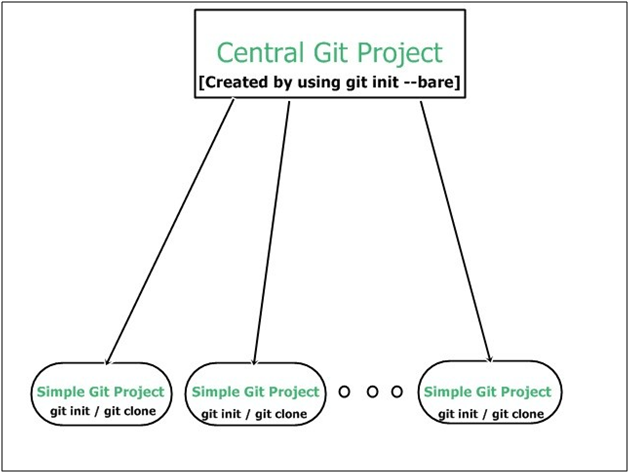
In the above figure, the Central Git project is created using the git init bare command. The Central Git project can be on Github.com or on your local machine or on your central server. While the simple git projects are created by using git init/git clone by developers. Now we will see how to create a Central Git project.
Now we will see how to create a Central Git project through steps mentioned below.
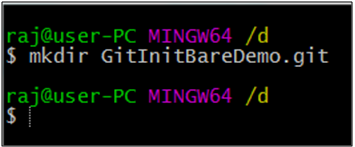
Create a new directory with .git extension as shown below. I have created on the D drive of my local machine. Use below command to do it.
$ mkdir {ProjectName}.git
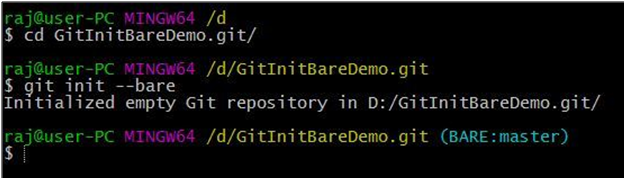
Now execute the git bare command to make the project a Central Git Project. See the below command and image.
$ git init –bare
The main thing to remember is bare repository does not contain the code base of the project. It just contains the status of the branches and everything that requires maintaining a central repository. Below image shows the content of the bare repository.

As shown in above image the bare repository contains the same folders that will be present in your simple project’s “.git” directory. It will not have the actual code base. So this is the basic difference between git init and git bare command.
Hope you liked this article. Do comment below and leave feedbacks. Your suggestions are always welcome.


