This article explains to you how to create and use Views in MySQL
What are views?
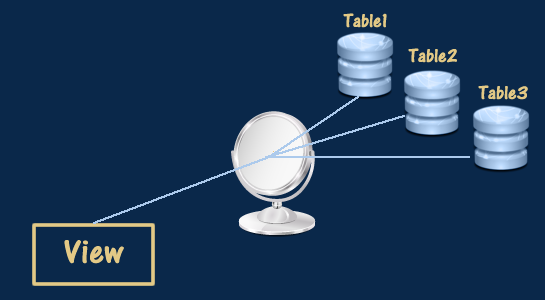
Views are introduced in MySQL Server 5.0 and available in releases 5.0.1 and above. Views in MySQL exactly look like regular tables but are the “Virtual Tables” which provide a simple interface to the complex queries in MySQL.Views are not storing any data physically. It is just stored predefined queries that return a result set.
The view is a unique way of fetching a data from the table which doesn’t depend on changes in the data.
How to CREATE and Use Views in MySQL?
While creating a Views in MySQL, It creates a temporary table based on the view statement and executes the query based on this temporary table. Each and every time, when a view is altered or replaced, a copy of the view is stored in the archive folder which is in the database folder. So we can say that it is taking up the backup of views in MySQL each time you change the view.
First of all, we will understand the statement creates a new view.
SYNTAX:
Let’s understand the basic syntax to create a view in MySQL.
CREATE VIEW `view_name` AS SELECT statement;
Parameters:
“CREATE VIEW
SELECT statement: “AS SELECT statement” is the SQL statements to generate the views. A SELECT statement contains one table or multiple tables data.
In the basic syntax to create a view, replace the name with the actual name of the view, and replace the SELECT statement with the SQL query that you want to use.
It is good to prefix Views names with a label so that you can identify views easily while listing the views using SHOW TABLES command.
How to modify view in MySQL?
MySQL has two methods to modify an existing view:
- ALTER VIEW
- CREATE OR REPLACE VIEW
ALTER VIEW method
First of all, let’s understand the first method ALTER VIEW:
You can modify view once it is created using ALTER view statement.
SYNTAX:
ALTER VIEW `view_name` AS SELECT statement;
The ALTER VIEW syntax is similar to the CREATE VIEW except CREATE keyword is replaced by the ALTER keyword.
CREATE OR REPLACE VIEW method
Now, Let’s take a look at CREATE OR REPLACE VIEW method. You can use CREATE OR REPLACE VIEW statement to either create or replace an existing view respectively. In case, the view already exists in a database, it will modify existing one or create a new one.
SYNTAX:
The following syntax is used to CREATE OR REPLACE VIEW
CREATE OR REPLACE VIEW `view_name` AS SELECT statement;
How to delete a view in MySQL?
There is different syntax in MySQL to delete a view, you can’t use the DROP TABLE command to drop a view.View delete syntax in MySQL is similar to the syntax of the deletion of the base tables. Here is the syntax
SYNTAX:
DROP VIEW
Please note, if you drop the table in MySQL, that doesn’t mean it will automatically drop any related views. You have to manually delete the view using above syntax.
Advantages of views in MySQL:
1. View enhance the database security and integrity as you can only grant the view access to the users, not the table and this way you can hide the table columns from users.
2. You can construct simplified, abstracted interfaces to complex databases using views in MySQL.
3. You can change the data structure without affecting the code using the views.
4. It is very easy to use because of the automatic execution of queries.
DisAdvantages of views in MySQL
1. You can’t create index on views in MySQL
2. You can’t use the Subqueries in select statement used with Views before MySQL version 5.7.7
3. MySQL does not support materialized view.
4. You can not create a trigger on views in MySQL
CONCLUSION
Now, you can create and use views in your MySQL database. Also, You can monitor and process the contents of your database significantly
Views in MySQL is significantly improving the performance and provide the best solution for a query with static content. We have just learned about the MySQL views and how to create views in an easy manner.
Hope you liked the explanation. if, don’t forget to share with your friends. Do you want to receive new detailed tutorials and tips published at? Enter your email address in subscribe box.


